
What to do in winter in the garden?


What to do in winter in the garden?
MONTHLY CHECKLIST FOR GARDENERS
December offers a unique set of tasks for gardeners as the garden enters its dormant phase. Here’s a handy checklist to keep your garden healthy and thriving throughout the winter months:
Protect Plants from Frost
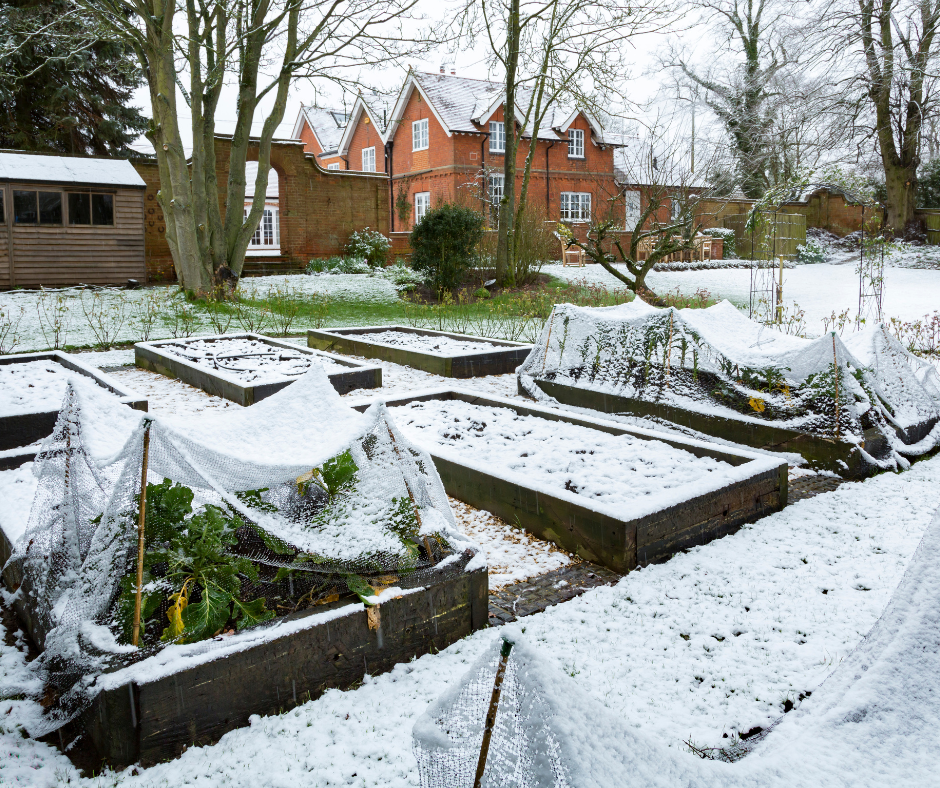
Protect Plants from Frost by taking proactive measures as winter sets in. Frost can damage or kill tender plants, so it’s essential to prepare your garden accordingly. Cover with Protective Materials. Use frost cloths, horticultural fleece, or burlap to cover plants, especially during nights when frost is expected. These materials provide an insulating layer that traps heat from the ground, keeping plants warmer. Use Cloches or Cold Frames For individual plants or small groups, cloches (bell-shaped covers) or cold frames (small greenhouse-like structures) can provide excellent frost protection. They create a microclimate that shields plants from harsh temperatures. Mulch Heavily Apply a thick layer of mulch around the base of plants. Mulch acts as an insulator, maintaining soil warmth and protecting plant roots from freezing. Water the Soil Moist soil retains heat better than dry soil, so watering your plants a day or two before a frost can help protect them. Avoid watering during freezing temperatures, as this can cause ice to form on leaves.
Bring Potted Plants Indoors Move potted plants indoors or to a sheltered location during frost events. This is especially important for tropical or sensitive plants that can’t withstand cold temperatures. Create Windbreaks Set up windbreaks using stakes and fabric to reduce wind chill, which can exacerbate frost damage. This is particularly useful for exposed gardens or areas prone to strong winds. Group Plants Together
Move plants closer together to create a microenvironment that retains warmth. Grouping them also makes it easier to cover a larger area with a single protective layer.
Monitor Weather Forecasts Stay informed about upcoming weather conditions to prepare your garden in advance. Knowing when frost is likely can help you implement protective measures in a timely manner. By implementing these protective strategies, you can safeguard your plants against frost damage, ensuring they remain healthy and ready to thrive when warmer weather returns.


Mulch Garden Beds
Mulch Garden Beds to prepare for winter by applying a thick layer of mulch to your garden beds. This practice not only provides insulation to the soil, helping to protect plant roots from freezing temperatures, but it also conserves moisture, suppresses weeds, and adds organic matter as it decomposes. Choose the Right Mulch Select a mulch that suits your garden’s needs. Organic mulches like shredded leaves, straw, wood chips, or bark are excellent choices as they enrich the soil as they break down. For a more decorative touch, consider using colored wood chips or bark. Prepare the Soil Before applying mulch, remove any existing weeds and water the soil if it’s dry. This ensures that your plants have a good start come spring. Apply the Mulch Spread a layer of mulch around 2-4 inches thick over your garden beds. Be careful not to pile mulch directly against plant stems or tree trunks, as this can lead to rot. Maintain a Consistent Layer Ensure the mulch is evenly distributed across your beds. This helps maintain consistent soil temperature and moisture levels. Replenish as Needed Over time, mulch will break down and may need to be topped up to maintain its effectiveness. Check your mulch layer periodically and add more if necessary, especially after heavy rains or wind. By properly mulching your garden beds, you can create a healthier environment for your plants to overwinter, setting the stage for a vibrant and productive growing season in the spring.
Prune Deciduous Trees and Shrubs
Prune Deciduous Trees and Shrubs to promote healthy growth and maintain their shape. Winter is an ideal time for pruning because deciduous trees and shrubs have lost their leaves, making it easier to see the structure and identify any issues. Gather the Right Tools
Use clean, sharp tools such as pruning shears, loppers, and a pruning saw for thicker branches. Sterilize your tools before and after use to prevent the spread of disease.
Assess the Plant Structure Take a step back to observe the natural form of the tree or shrub. Identify any dead, diseased, or damaged branches that need removal. Also, look for branches that cross or rub against each other, as these can cause wounds and harbor pests. Start with Dead and Diseased Wood Remove any dead or diseased branches first. Cut back to healthy wood or to the branch collar, the swollen area where the branch meets the trunk or another branch. Thin Out Crowded Areas. Thin out areas where branches are crowded to improve air circulation and light penetration. This encourages healthy growth and reduces the risk of disease. Shape the Plant. Prune to maintain or enhance the natural shape of the plant. Make cuts at a 45-degree angle, just above a bud facing the direction you want the new growth to take. Avoid Over-Pruning. Be cautious not to remove more than 25% of the plant’s total growth in a single season. Over-pruning can stress the plant and reduce its vigor. Dispose of Clippings Properly. Collect and dispose of pruned material to prevent the spread of disease. Compost healthy clippings if you have a garden compost system. By following these steps, you can effectively prune your deciduous trees and shrubs, promoting robust growth and enhancing their beauty for the upcoming growing season. Regular pruning not only improves the health and appearance of your plants but also increases their resilience to pests and diseases.


Plan Next Year’s Garden
Plan Next Year’s Garden by taking advantage of the winter months to reflect on the past growing season and make thoughtful decisions for the year ahead. Planning your garden now allows you to prepare for a successful and enjoyable gardening experience come spring. Reflect on This Year’s Successes and Challenges. Take note of what worked well in your garden and what didn’t. Consider factors such as plant performance, pest issues, and weather impacts. This reflection will help guide your decisions for the upcoming year.
Research New Plants and Varieties. Explore new plant varieties that might thrive in your garden’s conditions. Consider factors like climate, soil type, and sunlight when choosing plants. Try incorporating a mix of perennials, annuals, and native species to enhance biodiversity. Draw Up a Planting Plan. Create a layout for your garden, taking into account the size and spacing requirements of different plants. Use this plan to ensure you’re making the most of your available space while allowing for healthy growth and air circulation. Order Seeds and Bulbs. Now is the perfect time to order seeds and bulbs for spring planting. Consider starting some seeds indoors to get a head start, especially for plants with a longer growing season. Consider Crop Rotation and Companion Planting.
Implement crop rotation to prevent soil depletion and reduce pest issues. Companion planting can also enhance plant health and productivity by pairing compatible species that support each other’s growth. Plan for Soil Improvement. Consider what amendments your soil might need to support healthy plant growth. Winter is a good time to test your soil and plan for adding compost, organic matter, or specific nutrients as needed. Set Gardening Goals. Define what you hope to achieve with your garden next year. Whether it’s growing more of your own food, creating a pollinator-friendly space, or simply enhancing your garden’s beauty, having clear goals will keep you focused and motivated.
By planning ahead, you set the stage for a successful and rewarding gardening season. With thoughtful preparation, you can look forward to a vibrant and productive garden that brings joy and satisfaction throughout the year.
Clean and Store garden Tools
Clean and Store garden Tools to ensure they remain in excellent condition for the next gardening season. Proper care and storage of your tools can prolong their lifespan and make your gardening tasks more efficient. Clean Off Dirt and Debris.
Begin by removing any dirt, sap, or debris from your tools. Use a stiff brush to scrub off soil and plant residue. For stubborn dirt, rinse the tools with water and use mild soap if necessary. Remove Rust. Inspect your tools for rust and use steel wool or a wire brush to remove it. You can also soak the metal parts in a solution of vinegar and water to loosen rust before scrubbing. Sharpen Blades. Tools like pruners, shears, and hoes benefit from regular sharpening. Use a file or sharpening stone to keep blades sharp, ensuring they cut cleanly and efficiently. Oil Moving Parts. Apply a light coat of oil to metal parts and moving joints to prevent rust and ensure smooth operation. Linseed oil works well on wooden handles to prevent them from drying out and cracking. Check for Repairs.
Examine your tools for any damage or wear. Tighten loose screws or bolts, and replace any broken parts. This maintenance will keep your tools safe and functional.
Store Properly. Hang tools on a wall or store them in a dry, sheltered area to prevent rust and damage. Consider using pegboards or tool racks to keep tools organized and easily accessible. Cover with Protective Coating. For long-term storage, consider applying a protective coating or wrapping tools in a rust-preventive cloth to shield them from moisture. By taking the time to clean and store your garden tools properly, you ensure they are ready for action when the gardening season begins again. With well-maintained tools, you can enjoy more efficient and satisfying gardening experiences.


Feed the Birds
Feed the Birds during the winter months to support local wildlife and enhance your garden’s ecosystem. Birds play a crucial role in controlling pests and pollinating plants, making them valuable allies in any garden. Choose the Right Feeders. Select feeders that suit the types of birds you want to attract. Tube feeders are great for small birds like finches, while platform feeders can accommodate larger birds such as cardinals and jays. Suet feeders are ideal for insect-eating birds, providing them with essential fats during cold weather. Offer a Variety of Foods. Provide a mix of seeds, nuts, suet, and fruit to cater to different bird species. Black oil sunflower seeds are a favorite for many birds, while nyjer seeds attract finches. Suet cakes provide energy-rich fats that are especially beneficial during winter. Keep Feeders Clean. Regularly clean your feeders to prevent the spread of disease. Use a mild bleach solution to disinfect feeders every couple of weeks, and ensure they are thoroughly rinsed and dried before refilling. Provide Fresh Water.
Birds need water for drinking and bathing, even in winter. Use a heated birdbath to keep water from freezing, or change the water frequently to ensure it remains accessible.
Create Shelter. Offer birds shelter by planting evergreen shrubs or providing roosting boxes. These can protect birds from harsh weather and predators, giving them a safe place to rest. Avoid Chemical Pesticides.Reduce or eliminate the use of chemical pesticides in your garden. This ensures that birds can safely eat the insects they find and that your garden remains a healthy habitat. By feeding the birds and creating a welcoming environment, you can enjoy the beauty and song of these creatures while contributing to the health and balance of your garden’s ecosystem.
Inspect Stored Bulbs and Tubers
Inspect Stored Bulbs and Tubers for signs of rot, disease, or damage, as these issues can affect their viability for planting in the upcoming season. Proper inspection and care of bulbs and tubers during their storage period can ensure a successful bloom or harvest when conditions are right. Check for Soft Spots or Mold. Gently squeeze each bulb or tuber to feel for any soft spots, which could indicate rot. Look for any visible mold or fungal growth on the surface. If you find affected bulbs or tubers, remove them immediately to prevent the spread of disease. Examine for Pest Damage
Inspect for signs of pest damage, such as holes or chew marks. If you notice any pests, such as insects or rodents, take steps to address the issue, like setting traps or using natural repellents. Ensure Proper Storage Conditions. Maintain optimal storage conditions by keeping bulbs and tubers in a cool, dry, and dark environment. Ideal temperatures usually range from 35°F to 50°F (1°C to 10°C), depending on the specific type of bulb or tuber. Good air circulation is also important to prevent moisture buildup.
Repack with Fresh Material. If necessary, repack your bulbs and tubers with fresh, dry material like peat moss, sawdust, or vermiculite to absorb excess moisture and protect them from damage. Label for Identification. Ensure all stored bulbs and tubers are properly labeled, so you know exactly what you have when it’s time to plant. This is especially helpful if you are storing multiple varieties or species.
Plan for Planting. As you inspect your stored bulbs and tubers, make a note of any that may need to be planted earlier or in a specific location. This can help you organize your planting schedule and ensure a vibrant garden in the spring.
By regularly inspecting and properly maintaining your stored bulbs and tubers, you can increase their chances of thriving once planted. This proactive care helps set the stage for a beautiful and bountiful garden in the coming season.


Maintain Greenhouses and Cold Frames
Maintain Greenhouses and Cold Frames to ensure they provide an optimal environment for your plants during the colder months. Proper maintenance of greenhouses and cold frames is essential for protecting plants from harsh weather while promoting healthy growth. Clean and Disinfect. Thoroughly clean the inside and outside of your greenhouse or cold frame. Remove any accumulated dirt, algae, or debris on the glass or plastic panels. Use a mild disinfectant to prevent the buildup of mold and mildew, which can harm plants. Check for Damage. Inspect the structure for any signs of wear or damage, such as cracks in the panels, broken hinges, or gaps in the seals. Repair or replace any damaged parts to maintain insulation and prevent cold air from seeping in.
Ventilation – Ensure that ventilation systems, such as vents or windows, are functioning correctly. Proper ventilation is crucial to prevent condensation, which can lead to fungal diseases. Open vents or windows on mild days to allow fresh air circulation.
Insulate for Winter. Add extra insulation to retain heat during the colder months. You can use bubble wrap or horticultural fleece to line the interior walls of your greenhouse or cold frame. This helps maintain a stable temperature and reduces heating costs.
Monitor Temperature and Humidity. Use a thermometer and hygrometer to keep track of the temperature and humidity levels inside your greenhouse or cold frame. Adjust heating or ventilation as needed to maintain optimal conditions for plant growth.
Organize and Plan Plant Layout. Arrange plants to make the most efficient use of space and light. Consider placing taller plants at the back and shorter ones at the front. Ensure all plants have access to adequate light and are not overcrowded.
Prepare for Pests. Keep an eye out for pests that may enter during the winter. Use organic pest control methods to manage any infestations without harming your plants.
By maintaining your greenhouses and cold frames with these steps, you can provide a nurturing environment for your plants, ensuring they thrive even in the coldest months. This preparation will also set you up for a successful growing season in the spring.