
How to design garden irrigation – Step 2

How to design garden irrigation – step 2 – garden design scheme
How do you do garden irrigation? In the previous post, we established that we start with the design, which we place in the hands of a subject matter expert, and take on the work ourselves. Construction starts with the foundation, which in the case of an irrigation system is the correct design of the irrigation system. This stage of the work requires both your involvement and that of the designer. To this end, it is necessary to quite meticulously prepare and collect basic information on the planned investment. These in a collective file we will send to the irrigation design specialist.
Schematic of the garden for the irrigation design: the basic element required for the design of the irrigation system is, of course, the ground plan of the area where we want to do the irrigation. Of course, the easiest solution for a designer is to provide a ready-made garden plan. However, if you don’t have a gutsy design from a landscape architect, that’s fine too. You can help yourselves in a very easy way and, contrary to appearances, it won’t require a great deal of work. You can choose from the following solutions
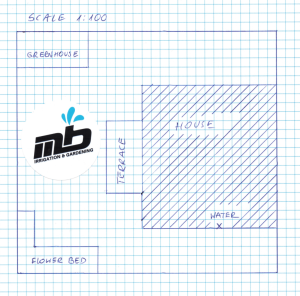
Hand-drawing: with this solution, we always awaken our creativity, so that the garden can look 100% as we want it to. The truth is that for the design of an irrigation system, we do not need a beautiful design that you will paint with crayons and paints for the next two weeks. For us designers, the most important thing is a simple diagram. That is, nothing more than marking the main areas on your plot, such as the house, paving, woodsheds, barbecue areas and other areas or buildings that should not be irrigated with sprinklers. You don’t even need to demarcate and specify what exactly your plot is – mark, in one pattern or colour, that these are areas that are not irrigated.
Next, we mark the lawn area – this is the second element we mark on the diagram for the irrigation project. The third and final area is the generally accepted beds (hedges, flowerbeds, plants, vegetable beds, etc.) the only deviation where you need to mark an additional (fourth) area is the greenhouse or vegetable garden. Often these elements should be irrigated independently of the other plants.
As you can see for yourself, preparing a diagram of your garden by hand is not difficult. All you need to do is equip yourself with a grid sheet of paper and adopt a scale. We recommend that this is a scale of 1:100, i.e. simply 2 small grids = 1 metre.Keeping the proportions, i.e. the scale, is extremely important when doing the irrigation. Only in this way can we be sure that the designed irrigation system will not be just another ordinary water installation in the garden, but will properly irrigate our garden.
Below is a simple schematic diagram for an irrigation system design provided to us by the client. Based on such a site plan, we are able to produce a precise scheme for your garden irrigation system very quickly and efficiently:
– plot layout for irrigation system: own drawing / photo/
– Diagram of plot development for irrigation system: source Google Maps
Landscaping design from an architect: the ideal solution is to have a ready-made garden design. In this situation, a version with the surfaces laid out in the garden should be sent to the specialist. Everything else is clear as in the ready-made example design below. For an irrigation system designer, receiving a finished garden design is comparable to receiving the Holy Grail J
Based on the possibilities presented, you can choose one that suits you best. Equipped with the plot location plan, you should still remember to mark the location of the water intake and to specify its parameters, which I describe in the next entry.